Introduction to No-Bake Vanilla Cream Dessert Bars
Hey there, fellow dessert lovers! If you’re anything like me, you know that sometimes life gets busy, and you need a quick solution to satisfy that sweet tooth. That’s where these delightful No-Bake Vanilla Cream Dessert Bars come in! They’re not just easy to whip up; they’re also a guaranteed crowd-pleaser. Imagine serving these creamy, dreamy bars at your next gathering, and watching everyone’s faces light up with joy. Trust me, this recipe is perfect for impressing your loved ones without spending hours in the kitchen. Let’s dive into this delicious adventure together!
Why You’ll Love This No-Bake Vanilla Cream Dessert Bars
These No-Bake Vanilla Cream Dessert Bars are a dream come true for anyone who loves dessert but hates the hassle of baking. They come together in just 20 minutes, making them perfect for those last-minute gatherings or a sweet treat after dinner. Plus, the creamy texture and rich vanilla flavor will have everyone coming back for seconds. Trust me, you’ll want to keep this recipe close at hand!
Ingredients for No-Bake Vanilla Cream Dessert Bars
Let’s gather our ingredients for these scrumptious No-Bake Vanilla Cream Dessert Bars! Each component plays a vital role in creating that creamy, dreamy texture we all crave. Here’s what you’ll need:
- Graham cracker crumbs: These form the base of our bars, providing a sweet and crunchy texture. You can also use digestive biscuits if you prefer.
- Unsalted butter: Melted butter helps bind the crust together, giving it a rich flavor. Make sure it’s unsalted to control the overall saltiness.
- Sugar: A touch of sugar sweetens the crust, balancing the flavors perfectly.
- Heavy cream: This is the star of the filling! Cold heavy cream whips up beautifully, creating that luscious texture.
- Cream cheese: Softened cream cheese adds a rich, creamy base to our filling. It’s essential for that classic cheesecake flavor.
- Powdered sugar: This sweetener dissolves easily, ensuring a smooth filling without any gritty texture.
- Vanilla extract: Pure vanilla extract infuses the bars with a warm, aromatic flavor. You can also use seeds from a vanilla bean for an extra touch of luxury.
- Unflavored gelatin (optional): If you want firmer bars, this ingredient helps stabilize the filling. Just dissolve it in water before adding.
- Whipped cream: Topping the bars with whipped cream adds a light, airy finish. Make sure it has stiff peaks for the best results.
- Extra graham cracker crumbs: These are perfect for garnishing the top, adding a little crunch and visual appeal.
For exact measurements, check the bottom of the article where you can find everything listed for easy printing. Now, let’s get ready to create some magic in the kitchen!
How to Make No-Bake Vanilla Cream Dessert Bars
Step 1: Prepare the Crust
Let’s kick things off by making the crust! In a mixing bowl, combine the graham cracker crumbs, melted butter, and sugar. Stir until everything is well mixed and resembles wet sand. Now, take this mixture and press it firmly into the bottom of a lined 9×9 inch baking pan. Make sure it’s even and compact; this will be the sturdy base for our No-Bake Vanilla Cream Dessert Bars. Once done, pop it in the fridge while we work on the filling!
Step 2: Make the Cream Filling
Now, let’s create that luscious cream filling! In a large bowl, beat the softened cream cheese until it’s smooth and creamy. Gradually add the powdered sugar and vanilla extract, mixing well until everything is combined. The mixture should be velvety and free of lumps. This step is crucial for achieving that rich flavor in your No-Bake Vanilla Cream Dessert Bars. Set this aside while we whip the cream!
Step 3: Whip the Cream
Time to whip up some heavy cream! In a separate bowl, pour in the cold heavy cream. Using an electric mixer, whip it on medium-high speed until stiff peaks form. This means the cream should hold its shape when you lift the beaters. It’s like magic watching it transform! This whipped cream will add that light, airy texture to our filling, making these bars irresistible.
Step 4: Combine and Fold
Now comes the fun part—combining everything! Gently fold the whipped cream into the cream cheese mixture. Use a spatula and be careful not to deflate the whipped cream. You want to keep that fluffy texture intact. This step is key to achieving the creamy, dreamy filling that makes these No-Bake Vanilla Cream Dessert Bars so special. Once combined, you’re ready to spread it over the crust!
Step 5: Assemble the Bars
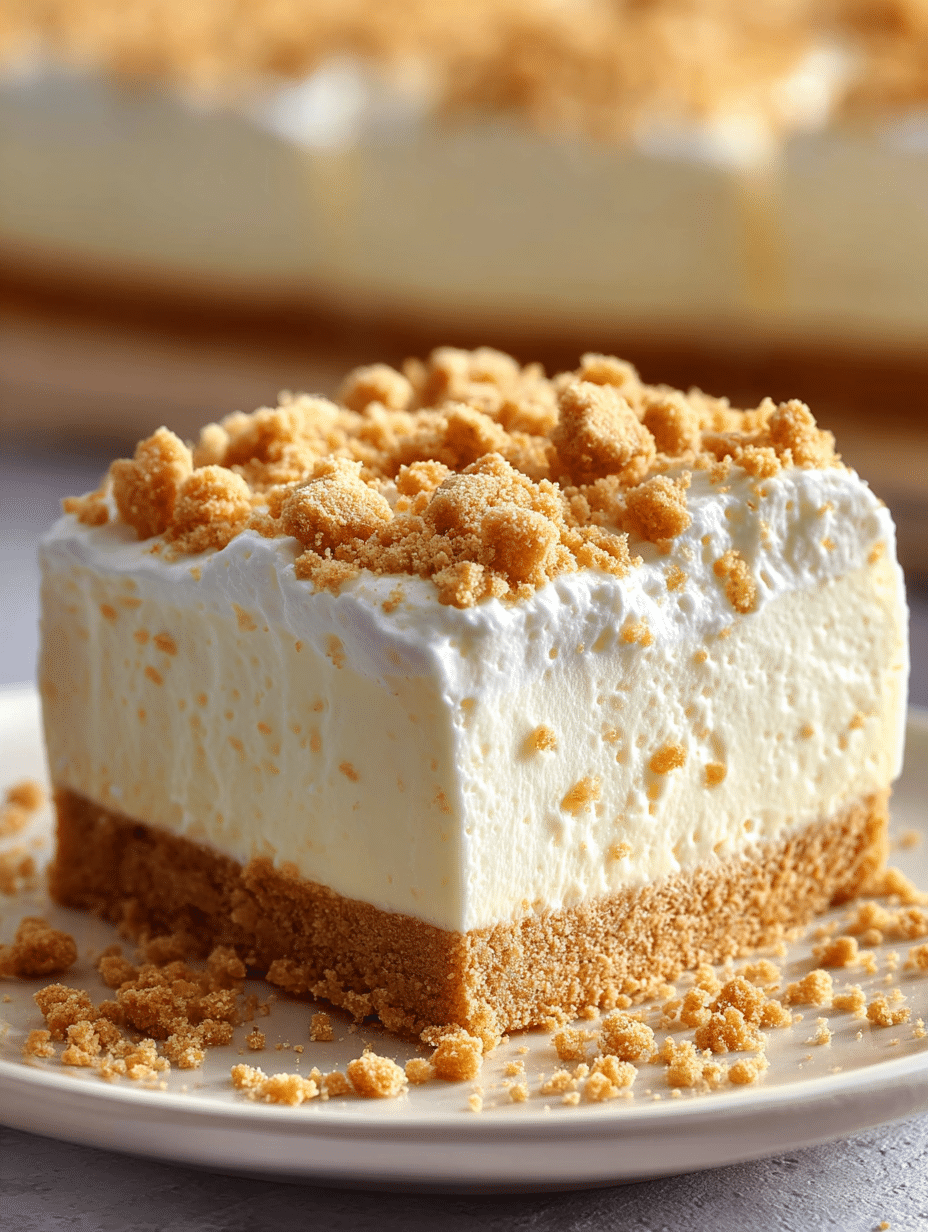
Let’s assemble our delicious creation! Take the cream filling and spread it evenly over the chilled crust. Use a spatula to smooth it out, making sure it reaches all corners. For an extra touch, top it with a generous layer of whipped cream. Finally, sprinkle some extra graham cracker crumbs on top for that delightful crunch. Your bars are starting to look amazing!
Step 6: Chill and Serve
Now, it’s time for the hardest part—waiting! Cover the pan and refrigerate the bars for at least 4 hours, or overnight for the best results. This chilling time allows the flavors to meld and the filling to set. Once they’re ready, slice them into bars and serve. Watch as everyone enjoys these No-Bake Vanilla Cream Dessert Bars, and don’t forget to savor the moment yourself!
Tips for Success
- Chill your mixing bowls and beaters before whipping the cream for better results.
- Use room temperature cream cheese to avoid lumps in your filling.
- For a fun twist, add a layer of fresh fruit between the crust and filling.
- Don’t skip the chilling time; it’s essential for the bars to set properly.
- Store leftovers in an airtight container in the fridge for up to 3 days.
Equipment Needed
- Mixing bowls: Use any size you have on hand; glass or stainless steel works best.
- Electric mixer: A hand mixer is perfect, but a whisk will do if you’re feeling adventurous!
- 9×9 inch baking pan: If you don’t have one, an 8×8 inch pan works just fine.
- Spatula: A rubber spatula is great for folding and spreading the filling.
- Measuring cups and spoons: Essential for accurate ingredient measurements.
Variations
- Fruit-Infused: Add a layer of fresh berries or sliced bananas on top of the cream filling for a fruity twist.
- Chocolate Lovers: Mix in some cocoa powder to the cream filling for a chocolate version of these No-Bake Vanilla Cream Dessert Bars.
- Nutty Crunch: Fold in crushed nuts like almonds or pecans into the filling for added texture and flavor.
- Gluten-Free: Substitute graham cracker crumbs with gluten-free cookies or almond flour for a gluten-free option.
- Vegan Version: Use coconut cream instead of heavy cream and a vegan cream cheese alternative for a plant-based treat.
Serving Suggestions
- Pair these No-Bake Vanilla Cream Dessert Bars with a scoop of vanilla ice cream for an indulgent treat.
- Serve alongside fresh berries for a pop of color and flavor contrast.
- Drizzle with chocolate or caramel sauce for an extra touch of sweetness.
- Garnish with mint leaves for a refreshing finish.
- Present on a beautiful platter to impress your guests!
FAQs about No-Bake Vanilla Cream Dessert Bars
Can I make No-Bake Vanilla Cream Dessert Bars ahead of time?
Absolutely! In fact, these bars taste even better when made a day in advance. Just make sure to cover them well in the fridge to keep them fresh.
What can I use instead of graham cracker crumbs?
If you don’t have graham cracker crumbs, digestive biscuits work wonderfully as a substitute. You can also use crushed cookies or even oats for a different flavor.
How long do these bars last in the fridge?
Your No-Bake Vanilla Cream Dessert Bars can be stored in the refrigerator for up to three days. Just keep them in an airtight container to maintain their freshness.
Can I freeze these dessert bars?
Yes, you can freeze them! Just slice them into bars, wrap them tightly in plastic wrap, and store them in a freezer-safe container. They’ll last for about a month.
What’s the best way to serve these bars?
For a delightful presentation, serve your No-Bake Vanilla Cream Dessert Bars chilled, topped with fresh fruit or a drizzle of chocolate sauce. They’re sure to impress!
Final Thoughts
Creating these No-Bake Vanilla Cream Dessert Bars is more than just a cooking experience; it’s a delightful journey filled with joy and satisfaction. Each layer, from the crunchy crust to the creamy filling, brings a smile to my face. I love how easy they are to make, yet they feel so special. Whether it’s a family gathering or a quiet night in, these bars are the perfect sweet treat. I hope you enjoy making them as much as I do. Trust me, every bite is a little piece of happiness that you’ll want to share with everyone!
Print
No-Bake Vanilla Cream Dessert Bars You Must Try Today!
- Total Time: 4 hours 20 minutes
- Yield: 12 bars 1x
- Diet: Vegetarian
Description
Delicious and easy-to-make No-Bake Vanilla Cream Dessert Bars that are perfect for any occasion.
Ingredients
- 2 cups (200 g) graham cracker crumbs (or digestive biscuits, crushed)
- ½ cup (115 g) unsalted butter, melted
- 2 tbsp sugar
- 2 cups (480 ml) heavy cream, cold
- 450 g (16 oz) cream cheese, softened
- 1 cup (120 g) powdered sugar
- 1 tbsp vanilla extract (or seeds from 1 vanilla bean)
- 1 packet (7 g) unflavored gelatin + 3 tbsp water (optional, for extra firmness)
- 1 cup (240 ml) whipped cream (stiff peaks)
- Extra graham cracker crumbs for garnish
Instructions
- Mix graham crumbs, melted butter, and sugar until combined.
- Press firmly into the bottom of a lined 9×9 inch (23×23 cm) baking pan.
- Refrigerate while preparing filling.
- In a bowl, beat cream cheese until smooth. Add powdered sugar and vanilla, and mix well.
- In another bowl, whip cold heavy cream until stiff peaks form.
- Gently fold whipped cream into cream cheese mixture until fluffy.
- (Optional: dissolve gelatin in water, let cool slightly, then fold into filling for firmer bars.)
- Spread cream filling evenly over chilled crust.
- Top with whipped cream and sprinkle with extra graham crumbs.
- Refrigerate at least 4 hours (overnight for best results) before slicing into bars.
Notes
- For best results, chill overnight.
- Feel free to add fresh fruit on top for added flavor.
- Store leftovers in the refrigerator for up to 3 days.
- Prep Time: 20 minutes
- Cook Time: 0 minutes
- Category: Dessert
- Method: No-Bake
- Cuisine: American
Nutrition
- Serving Size: 1 bar
- Calories: 300
- Sugar: 20g
- Sodium: 150mg
- Fat: 22g
- Saturated Fat: 12g
- Unsaturated Fat: 8g
- Trans Fat: 0g
- Carbohydrates: 25g
- Fiber: 1g
- Protein: 3g
- Cholesterol: 60mg


