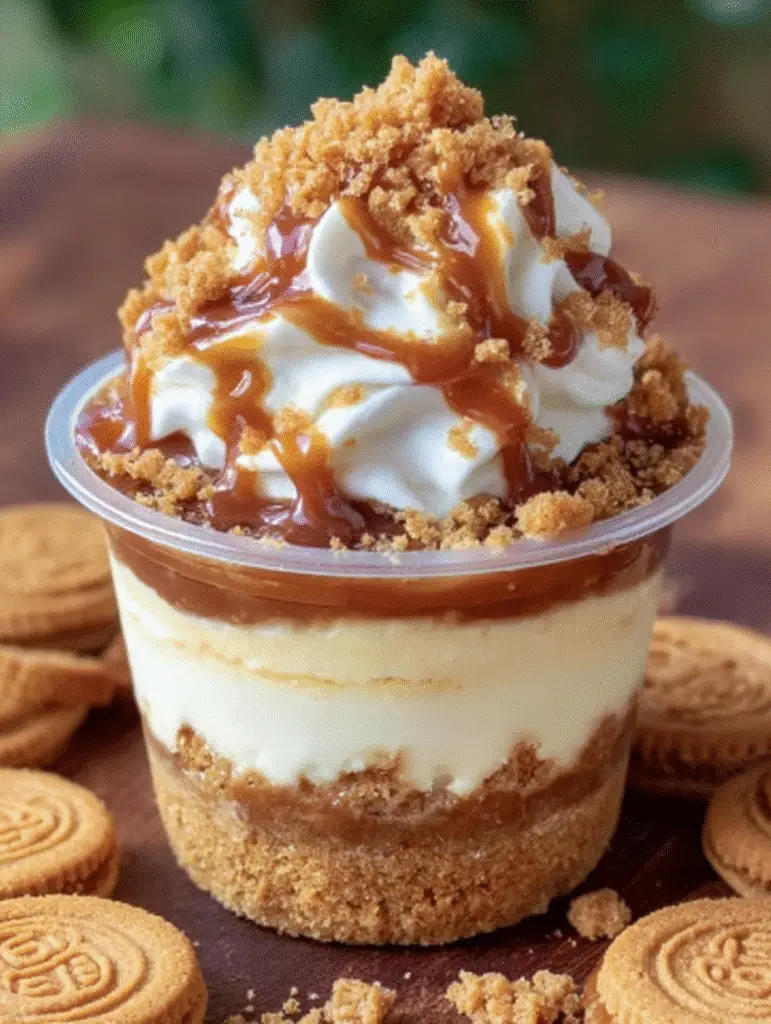
Introduction to Cookie Butter Cheesecake Cups
Hey there, fellow dessert lovers! If you’re anything like me, you know that sometimes life gets busy, and you need a quick solution to satisfy that sweet tooth. Enter the delightful Cookie Butter Cheesecake Cups! These little gems are not just a treat; they’re a creamy, dreamy indulgence that will impress your loved ones without keeping you in the kitchen for hours. With layers of rich cheesecake and cookie butter, they’re perfect for any occasion, whether it’s a cozy night in or a gathering with friends. Trust me, you’ll want to make these again and again!
Why You’ll Love This Cookie Butter Cheesecake Cups
These Cookie Butter Cheesecake Cups are a game-changer for dessert lovers! They’re incredibly easy to whip up, making them perfect for busy weeknights or last-minute gatherings. The taste? Oh, it’s pure bliss! The creamy cheesecake paired with the warm, spiced notes of cookie butter creates a flavor explosion that will have everyone asking for seconds. Plus, they’re no-bake, so you can enjoy them without the fuss of turning on the oven!
Ingredients for Cookie Butter Cheesecake Cups
Let’s dive into the deliciousness that makes up these Cookie Butter Cheesecake Cups! Here’s what you’ll need:
- Cookie Butter Sandwich Cookies or Speculoos Cookies: These are the stars of the show! They create a crunchy, flavorful crust that pairs perfectly with the creamy filling.
- Unsalted Butter: This helps bind the cookie crumbs together, giving your crust that perfect texture. I always opt for unsalted to control the saltiness.
- Cream Cheese: The base of our cheesecake filling! Make sure it’s softened for easy mixing. It adds that rich, creamy goodness we all love.
- Heavy Cream: Whipping this cold cream gives our cheesecake its light and fluffy texture. Trust me, it makes a world of difference!
- Powdered Sugar: This sweetens the filling without adding any graininess. It’s a must for that smooth finish.
- Vanilla Extract: A splash of vanilla enhances the flavors and adds a warm, inviting aroma to your dessert.
- Cookie Butter Spread: This is the secret ingredient that takes these cups to the next level! It adds a luscious layer of flavor that’s hard to resist.
- Whipped Cream: For garnish, of course! It adds a light touch and makes everything look extra special.
- Extra Cookie Crumbs: These are perfect for sprinkling on top, adding a delightful crunch and visual appeal.
- Warmed Cookie Butter Drizzle: A drizzle of this on top is like the cherry on the sundae! It adds an extra layer of indulgence.
For exact measurements, check the bottom of the article where you can find everything listed for easy printing. Happy baking!

How to Make Cookie Butter Cheesecake Cups
Now that we have our ingredients ready, let’s dive into the fun part—making these Cookie Butter Cheesecake Cups! Follow these simple steps, and you’ll be on your way to dessert heaven in no time.
Step 1: Prepare the Cookie Crust
First things first, let’s create that delicious cookie crust. In a mixing bowl, combine the crushed cookie butter sandwich cookies or speculoos cookies with the melted unsalted butter. Stir until the mixture resembles wet sand. It should hold together when pressed. Now, take your serving cups or jars and firmly press this mixture into the bottom. This crust is the foundation of our cheesecake cups, so make sure it’s nice and compact!
Step 2: Make the Cheesecake Filling
Next up, it’s time to whip up the creamy cheesecake filling! In a separate bowl, beat the softened cream cheese until it’s smooth and creamy. This step is crucial for a velvety texture. In another bowl, whip the cold heavy cream until stiff peaks form. This will give our filling that light, airy quality. Now, gently fold the whipped cream into the cream cheese mixture, along with the powdered sugar and vanilla extract. Be careful not to deflate the whipped cream; we want to keep that fluffiness!
Step 3: Layer the Ingredients
Now comes the fun part—layering! Start by adding a layer of the cookie crust you prepared earlier into each cup. Then, spread a thin layer of slightly melted cookie butter over the crust. This adds a delightful flavor boost! Next, spoon the cheesecake filling on top of the cookie butter layer. If you’re feeling extra indulgent, repeat the layers for a more decadent treat. Trust me, no one will complain about a little extra cheesecake!
Step 4: Chill and Set
Once you’ve layered everything, it’s time to let these beauties chill. Cover the cups with plastic wrap and refrigerate for at least 2 to 3 hours. This chilling time is essential for the cheesecake to set properly. The longer they chill, the firmer and more delicious they become. Patience is key here, but I promise it’s worth the wait!
Step 5: Garnish and Serve
Finally, it’s time to make these Cookie Butter Cheesecake Cups look as good as they taste! Once they’re set, top each cup with a generous dollop of whipped cream. Sprinkle some extra cookie crumbs on top for that added crunch. And if you really want to impress, drizzle some warmed cookie butter over the whipped cream. It’s the perfect finishing touch that will have everyone swooning!
Tips for Success
- Use cold heavy cream for whipping; it helps achieve those perfect stiff peaks.
- Let the cream cheese soften at room temperature for easier mixing.
- For a firmer texture, chill the cheesecake cups overnight if you can wait!
- Feel free to customize the toppings; fresh fruit or chocolate shavings work wonders!
- Keep an eye on the layering; even layers make for a beautiful presentation.
Equipment Needed
- Mixing Bowls: A set of various sizes is ideal. You can also use any large bowl you have on hand.
- Electric Mixer: This makes beating the cream cheese a breeze. A whisk works too, but it’ll take more effort!
- Measuring Cups and Spoons: Essential for accuracy. If you don’t have them, use a regular cup for rough estimates.
- Serving Cups or Jars: Any small containers will do. Mason jars add a cute touch!
- Spatula: Perfect for folding and spreading. A spoon can work in a pinch!
Variations of Cookie Butter Cheesecake Cups
- Chocolate Cookie Crust: Swap the cookie butter sandwich cookies for chocolate sandwich cookies for a rich, chocolatey twist!
- Nut-Free Option: Use gluten-free cookies and ensure your cookie butter spread is nut-free for a safe treat for those with allergies.
- Fruit-Infused: Add a layer of fresh fruit, like sliced strawberries or raspberries, between the cheesecake filling and cookie butter for a refreshing burst of flavor.
- Vegan Version: Substitute cream cheese with a vegan cream cheese alternative and use coconut cream instead of heavy cream for a plant-based delight.
- Spiced Pumpkin Variation: Mix in some pumpkin puree and pumpkin spice into the cheesecake filling for a seasonal twist that’s perfect for fall!
Serving Suggestions
- Pair these Cookie Butter Cheesecake Cups with a hot cup of coffee or a chilled glass of milk for a delightful contrast.
- For a festive touch, serve them on a decorative platter with fresh berries or mint leaves.
- Consider adding a scoop of vanilla ice cream on the side for an extra indulgent experience!
- Use colorful spoons or dessert forks to make serving even more fun and inviting.
FAQs about Cookie Butter Cheesecake Cups
Got questions about these delightful Cookie Butter Cheesecake Cups? I’ve got you covered! Here are some common queries that might pop up as you embark on this sweet adventure.
Can I make Cookie Butter Cheesecake Cups ahead of time?
Absolutely! These cups are perfect for making ahead. Just prepare them and let them chill in the fridge for up to two days. They’ll be ready to impress when you are!
What can I use instead of cookie butter?
If you can’t find cookie butter, you can substitute it with Nutella or any other spread you love. Just keep in mind that it will change the flavor profile a bit!
How long do these cheesecake cups last in the fridge?
These Cookie Butter Cheesecake Cups can last up to 4 days in the fridge. Just make sure they’re covered well to keep them fresh and delicious!
Can I freeze Cookie Butter Cheesecake Cups?
Yes, you can freeze them! Just make sure to wrap them tightly. When you’re ready to enjoy, let them thaw in the fridge overnight for the best texture.
What’s the best way to serve these cups?
Serve them chilled, topped with whipped cream and a drizzle of warmed cookie butter. They look stunning in clear cups or jars, showcasing those beautiful layers!
Final Thoughts
Creating these Cookie Butter Cheesecake Cups is more than just making a dessert; it’s about crafting a moment of joy. Each layer tells a story, from the crunchy cookie crust to the creamy filling that melts in your mouth. I love how they bring smiles to faces, whether it’s a cozy night at home or a gathering with friends. Plus, the no-bake aspect means less time in the kitchen and more time enjoying life. So, gather your ingredients, unleash your inner chef, and let these delightful cups become a cherished part of your dessert repertoire!
Print
Cookie Butter Cheesecake Cups: A Delightful Treat!
- Total Time: 2-3 hours (including chilling time)
- Yield: 4–6 servings 1x
- Diet: Vegetarian
Description
Cookie Butter Cheesecake Cups are a delightful and indulgent dessert featuring a creamy cheesecake filling layered with cookie butter and a crunchy cookie crust.
Ingredients
- 1 ½ cups (150 g) cookie butter sandwich cookies or speculoos cookies, crushed
- 5 tbsp unsalted butter, melted
- 225 g (8 oz) cream cheese, softened
- ½ cup (120 ml) heavy cream, cold
- ½ cup (60 g) powdered sugar
- ½ tsp vanilla extract
- ½ cup cookie butter spread (slightly melted for easy spreading)
- Whipped cream (for garnish)
- Extra cookie crumbs (for garnish)
- Warmed cookie butter drizzle (for garnish)
Instructions
- In a bowl, mix crushed cookies with melted butter until sandy.
- Press firmly into the bottom of serving cups or jars.
- In one bowl, beat cream cheese until smooth.
- In another, whip heavy cream until stiff peaks form.
- Fold whipped cream, powdered sugar, and vanilla into cream cheese until fluffy.
- Add a layer of crust to each cup.
- Spread a thin layer of melted cookie butter over crust.
- Spoon cheesecake filling on top.
- Repeat layers if desired for extra indulgence.
- Refrigerate at least 2–3 hours, or until set.
- Top with whipped cream, cookie crumbs, and a drizzle of melted cookie butter.
Notes
- For best results, use cold heavy cream for whipping.
- Allow the cheesecake cups to chill thoroughly for a firmer texture.
- Feel free to customize the garnish with your favorite toppings.
- Prep Time: 20 minutes
- Cook Time: 0 minutes
- Category: Dessert
- Method: No-bake
- Cuisine: American
Nutrition
- Serving Size: 1 cup
- Calories: 350
- Sugar: 20g
- Sodium: 150mg
- Fat: 25g
- Saturated Fat: 15g
- Unsaturated Fat: 5g
- Trans Fat: 0g
- Carbohydrates: 30g
- Fiber: 1g
- Protein: 4g
- Cholesterol: 60mg


